Restore Previous Versions of Files in Every Edition of Windows 7

Have you ever accidently deleted a file, or removed a crucial part of a document only to realize it no longer makes sense?  Windows 7 is smart enough to protect you from yourself, and here we’ll see how you can restore files in any edition of Windows 7.

How does this work?

The Previous Versions features is a part of the volume shadow copy service, which creates restore points to help roll back changes to your computer in the event of a problem.  It is also the backend for the surprisingly good image based backup in Windows 7.  By default, shadow copy will save a copy of your files once a day, or when activated explicitly such as when installing an update or new program.

The Previous Versions feature was actually a new feature in Windows Vista, but was not directly available in the Home editions of Vista.  However, the volume shadow copy service was still present, allowing even users of Home editions of Vista to access previous versions of their files.  The default method is much simpler, so thankfully it is now included in every edition of Windows 7.

How do I access Previous Versions?

It is simple to access previous versions of any file or folder on your Windows 7 computer.  Simply open any Explorer window, right-click on a file or folder you wish to restore, and select “Restore Previous Versions.”  For instance, if you accidently deleted a file from a folder in My Documents, browse to that folder and open previous versions from it.  Please note that this will only appear on files and folders, not drives or Libraries.

image

This dialog shows all the previous copies of this folder that are available.  Here we see that there is a copy of my folder e-books from yesterday, 3 days earlier this week, and some from the week before that.  Click on the time you wish to restore from.

 image

You can choose to either Open, Copy, or Restore the folder.  If you click Restore, you can restore the full contents of the folder as it appeared at some time in the past.

 image

Choose copy to copy the entire contents of the folder as it appeared at that time to another location.  For instance, you could copy it to a flash drive for safe keeping.

image

Or, choose Open to browse the contents of the folder as it appeared at that time.  You can open, copy, or do anything you choose with the file from here.  For instance, if I deleted the Audio Books folder accidently today, I could click copy, and then past it into my normal e-books folder in my Documents folder.

 image

When in this mode, you are directly browsing the shadow copy of your hard drive.  The path to the folder shows the date and time of the copy.

image

And, the great thing is, this feature is available in all editions of Windows 7, including the low-cost Starter edition often preinstalled in netbooks.

sshot-7


Change Shadow Copy Settings

By default, the shadow copies of your files will use up to 5% of your hard drive space.  You can change this by typing “Shadow Copy” into your Start Menu search.  Click the “Create a restore point” link.

image

Here you can restore your system with a restore point, create a new restore point, or configure the settings.  Click Configure to manage Shadow Copy.

image

You can choose to save both system settings and previous versions of files, only previous versions of files, or to turn this feature off entirely (which we do not recommend at all).  You can also choose how much space will be dedicated to these files.  The default is 5% of your hard drive, but you can choose more or less if you wish.  Finally, you can also remove all previous restore points, including the previous versions of all your files.

image

Summary

The Previous Versions feature is definitely a lifesaver. You can actually retrieve deleted files using Shadow Copy in Server 2003.  It has saved us many times when we accidently deleted a file or removed important information from a document only to realize what we had done minutes later. For these and many other reasons, don’t panic and just check Previous Versions if you ever lose a file.

Got an opinion to share? Click here to join the discussion

Similar Articles Productive Geek Tips
Latest Software Reviews Tinyhacker Random Tips

How to Blur Out Faces and Other Portions of Video [Video Demonstration]

Ever wish you could achieve a documentary-style face blur in your video projects? DIY video blogger extraordinaire Tinkernut details how to do exactly that with a handful of free software.

The star application in this process is a free app called Wax, which handles video compositing and some special effects. Tinkernut’s excellent walkthrough covers every step in the process.

Apart from blurring the face, the video also covers how to change the voice to give it a little extra anonymity, but be aware: At the very least the voice adjustment is just a pitch change, so it could be reverse engineered easily enough by someone determined to hear the voice. The same may be true for the blur, but we're not exactly video modulation experts over here. Either way, this isn't a "hide from the KGB" guide—it's just a simple and effective method for blurring out faces or other sections of your video.


Buzz Settings Page Goes Live in Gmail, Allows Total Disabling [Updates]

As recently promised, Google has updated Gmail to include a “Buzz” tab, where you can prevent the public from seeing your followers list, remove the Buzz inbox from Gmail, and, as the nuclear option, completely kill your Buzz account

That last link, with the warning sign and red text, completely removes Buzz from your Google Profile, according to its wording. A commenter notes that it might also kill your Google Profile entirely, so be cautious if that’s something you want to keep around.

Are you hitting the killswitch on Buzz, merely hiding it from your inbox, or just waiting to see where this social network train ends up taking you? [via PC World]


School Spies Students Through Their Laptop Cameras [Privacy]

High School students have sued the Lower Merion School District in Philadelphia for spying on them using their laptops’ built-in cameras. School administrator activated the webcams remotely and recorded students’ activities at home. Way to go, KGB-wannabe assclowns. Updated

The situation was discovered by the Robbins, when their kid was disciplined for “improper behavior in his home.” How could that be possible? The Vice Principal showed a photo as the evidence. A photo taken with the school-provided laptop webcam.

Update: Talking to Gizmodo, one of the students at the district says that they suspected this but the school tech support gave excuses. His Early 2008 MacBook’s camera light would turn on at random:

Frequently, the green lights next to our iSight webcams will turn on. The school district claims that this is just a glitch. We are all doubting this now.

He can’t access the Activity Monitor because he doesn’t have enough privileges, but he says the school uses Apple Remote Desktop.

Another student has confirmed this:

I questioned the IT guy about why it was happening he said that it was because people logged out when an application using the camera was on, he also stated that they could in fact go and look through your webcam it would just violate the fifth ammendment and that’s why they didn’t.

Today, their principal went on loudspeaker and said that all this was “not true.”

Sure, Mr. Principal, sure. If the lawsuit accusations are true, I hope they ground these slimy people forever. [Lawsuit via BoingBoingThanks Jason!]


ChromiumOS Flow Adds Hardware Support, Customized Menus, and More [Updates]

Hexxeh, creator of the easiest way to test out Google’s Chrome OS, has updated his unofficial ChromiumOS build to automatically update, support more video and Wi-Fi hardware, use webcams, and offer menu customization. All it needs is a 2 GB USB stick.

That’s all it needs to boot, but whether it sings or just struggles depends on your hardware. It’s also a pretty hefty 327 MB download, straight from a server at the moment, but it might be the last time you’ll have to download for a while. Automatic updates, which were being beta tested in a previous update, are now set up by default, so you won’t have to re-flash your USB drive when Hexxeh pushes another update.

Need a primer on what Chrome/Chromium OS is all about? Head back to our first glimpse from Google’s announcement. Hit the link for a summation of what else is new in Flow, and tell us how it works on your own system in the comments.

It’s Flow time… [Hexxeh’s Blog via Download Squad]


Team Canada routs Norway in Olympic opener

Jarome Iginla scored a hat trick and Roberto Luongo made 15 saves as Team Canada trounced Norway 8-0 in its men’s hockey opener at the Vancouver Olympics on Tuesday night. Dany Heatley tallied twice, and Mike Richards, Ryan Getzlaf and Corey Perry had the other goals.

Run XP Mode on Windows 7 Machines Without Hardware Virtualization

One of the neatest new features in Windows 7 Professional and above is XP Mode, but not all machines are capable of running it. Today we show you how to use VMware to run XP Mode on machines without Hardware Virtualization.

How does this work?

Even if your computer doesn’t have hardware virtualization, you can still install XP Mode but just cannot run it as you can’t run Virtual PC.  Enter VMware Player.  This free program lets you create and run virtual machines, whether or not you have hardware virtualization.  And, it can directly import XP Mode so you can use that copy of XP for free.  A couple features are different, but it’s still a great replacement since you otherwise couldn’t use it at all.

Note: XP Mode does not work on Home Versions of Windows 7 and you’ll need VMware Player 3.0

Getting Started

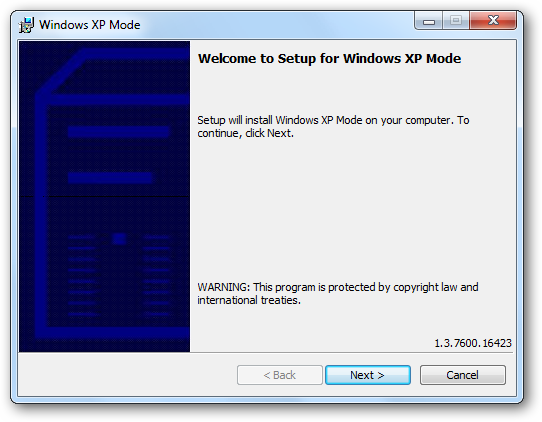
First, download and install XP Mode (link below).  There is no need to download Virtual PC if your computer cannot run it, so just download the XP Mode from the link on the left.

sshot-80

Install XP mode; just follow the default prompts as usual.

 sshot-81

Now, download and install VMware player.  The download is free, but requires registration.

sshot-79

You may see some prompts about installing drivers; simply approve them.  We didn’t see them on our latest test, but have in the past.  When you are finished installing VMware Player, you will have to restart your computer.

sshot-2010-02-16-[19-14-34]

Add XP Mode to VMware Player

Now that your computer is rebooted, run VMware Player.  We can import XP Mode by clicking File, then click “Import Windows XP Mode VM.”

sshot-38

VMware Player will simply start importing your XP Mode.  Converting XP mode to VMware format may take a couple minutes depending on your hardware, so just be patient.

sshot-41

When this is done, you should see a new virtual machine in VMware Player called XP Mode!  Click “Play Virtual Machine” to run XP Mode.

sshot-37

XP will run through it’s first-run setup process.

sshot-43

While it is loading, you may be prompted to install or update VMware Tools.  This is required to integrate XP Mode into your computer, so click Update Tools or Install Tools depending on you situation.

sshot-47

The tools will automatically download and install, though you may have to approve an UAC prompt.

sshot-51 

Now you can proceed with your XP setup.  Accept the license agreement,

sshot-55

Choose your locale and keyboard settings

sshot-57

Enter a name for the virtual machine and an administrative password

sshot-58

And enter the correct date, time, and timezone.  It usually gets the correct time and date from your computer itself, but the time zone is often incorrect.

sshot-59

XP will now finalize your changes, and then reboot.

sshot-61

When XP Mode restarts, choose your settings for updates.

 sshot-63 

Windows may ask to search for drivers.  Simply press cancel, as VMware Tools will contain everything we need.

sshot-62 

After a short delay, you should see your XP desktop in VMware Player!

sshot-65

There’s one last thing that needs to be installed – VMware Tools.  This should automatically open in XP Mode; if not, click Start, then My Computer, and finally double-click on the CD drive which should say VMware Tools.

sshot-2010-02-16-[20-02-36]

Now, simply run the Tools installer with the Typical setup type, and reboot the XP Mode when it’s finished.

sshot-67

Now VMWare is setup and we’re ready to start integrating it with Windows 7.

sshot-2010-02-16-[20-08-50]

Integrate XP Mode in VMware Player with Windows 7 

The real advantage of the default XP Mode in Windows 7 is that the XP programs are fully integrated with their Windows 7 counterparts.  You can run them seamlessly with other programs, copy between them, and even open and save files to the same folders.

Let’s set this up in VMware.  Copy and paste from Windows 7 to XP Mode in VMware is activated by default.  To use your XP programs seamlessly with Windows 7, click VM on the top of the VMware window, and click “Enter Unity.”

sshot-74

You can easily access any program or file in XP mode through a dedicated XP Mode Start Menu.  When you hover over your Windows 7 Start button, a new button called “Windows XP Mode” will above it.  Click there to access a full start menu from XP Mode right in Windows 7.

sshot-78

Here is an IE 6 window from XP running side-by-side with IE 8 in Windows 7, thanks to VMware Player!

sshot-77

By default, the virtualized windows will have a border and the VMware logo on their edge.

sshot-2010-02-16-[20-21-39]

To remove this logo, click VM in the VMware player window, then settings.  Click on the Options tab, and choose Unity on the left.  Now uncheck the boxes that say “Show borders” and “Show badges.”

sshot-76

Without having the VMWare borders and badges give everything a more authentic XP Mode look and feel.

sshot-2010-02-16-[20-23-15]

You can even use removable devices, such as flash drives, in XP Mode in VMware Player.  Whenever you connect a new device to your computer, VMware will remind you that you can add it to XP Mode.

sshot-82

Simply click VM, then Removable Devices.  Select your device name, and click Connect.

sshot-86

Save Files in XP Mode to My Documents in Windows 7

By default, files created in XP Mode in VMware Player will be saved inside the virtual machine.  It’s more convenient if they’re saved directly to the My Documents folder in Windows 7, so let’s change this.  Click VM, then Settings.  Click the Options tab, and then choose Shared Folders on the left.  Now click the bullet for “Always enabled” and check the box for “Map as a network drive in Windows guests.”

sshot-85

Now click Add at the bottom of that window.  This will let us add a shared folder.

sshot-87

Let’s add the My Documents folder from Windows 7.  Click Browse, and then select your My Documents folder.  Click Ok, and then click Next.

sshot-90

Make sure the box is checked that says “Enable this share” and then click Finish.  You can now close the settings window as well.

sshot-91

Back in XP Mode, click Start, then right click on My Documents, and select Properties.

sshot-4

Click Move to find the new My Documents folder.

  sshot-14

Find the folder we just shared from Windows 7 by clicking My Computer, then the drive that says “Shared Folders on ‘vmware-host’” or something similar.  Now select the folder we shared, Documents, and click Ok.

sshot-15

Click Ok in the main properties window.  It may offer to copy the files from your old My Documents folder to the new one; choose Yes to make sure you have all of your documents in Windows 7.

sshot-11

Now, whenever you go to save a file in XP Mode, it will automatically save in your My Documents folder on Windows 7.  You can repeat the same process for any folder you wish, such as your My Pictures and My Music folders.

Conclusion

That’s all … now you have your full XP Mode running on your computer without hardware virtualization.  Almost all the same features are there; the only thing you’re missing is the Start Menu integration, but VMware’s menu is the next best thing. In our tests using VMware worked as good or better as actual XP Mode on a machine that supports hardware virtualization. If you’re frustrated that the Windows 7 machine(s) you have don’t support XP Mode, using our VMware method works, and allows you to use it on whatever machine you want.

You might also want to check out our look at XP Mode in Windows 7 if your machine is capable of running it. To find out if your machine can run XP Mode the best tool we have used is Securable which is linked below.

Links

Download Windows XP Mode

Download VMware Player 3

Download Securable to Test if your Machine Can Run XP Mode.

Got an opinion to share? Click here to join the discussion

Similar Articles Productive Geek Tips
Latest Software Reviews Tinyhacker Random Tips

Run XP Mode on Windows 7 Machines Without Hardware Virtualization

One of the neatest new features in Windows 7 Professional and above is XP Mode, but not all machines are capable of running it. Today we show you how to use VMware to run XP Mode on machines without Hardware Virtualization.

How does this work?

Even if your computer doesn’t have hardware virtualization, you can still install XP Mode but just cannot run it as you can’t run Virtual PC.  Enter VMware Player.  This free program lets you create and run virtual machines, whether or not you have hardware virtualization.  And, it can directly import XP Mode so you can use that copy of XP for free.  A couple features are different, but it’s still a great replacement since you otherwise couldn’t use it at all.

Note: XP Mode does not work on Home Versions of Windows 7 and you’ll need VMware Player 3.0

Getting Started

First, download and install XP Mode (link below).  There is no need to download Virtual PC if your computer cannot run it, so just download the XP Mode from the link on the left.

sshot-80

Install XP mode; just follow the default prompts as usual.

 sshot-81

Now, download and install VMware player.  The download is free, but requires registration.

sshot-79

You may see some prompts about installing drivers; simply approve them.  We didn’t see them on our latest test, but have in the past.  When you are finished installing VMware Player, you will have to restart your computer.

sshot-2010-02-16-[19-14-34]

Add XP Mode to VMware Player

Now that your computer is rebooted, run VMware Player.  We can import XP Mode by clicking File, then click “Import Windows XP Mode VM.”

sshot-38

VMware Player will simply start importing your XP Mode.  Converting XP mode to VMware format may take a couple minutes depending on your hardware, so just be patient.

sshot-41

When this is done, you should see a new virtual machine in VMware Player called XP Mode!  Click “Play Virtual Machine” to run XP Mode.

sshot-37

XP will run through it’s first-run setup process.

sshot-43

While it is loading, you may be prompted to install or update VMware Tools.  This is required to integrate XP Mode into your computer, so click Update Tools or Install Tools depending on you situation.

sshot-47

The tools will automatically download and install, though you may have to approve an UAC prompt.

sshot-51 

Now you can proceed with your XP setup.  Accept the license agreement,

sshot-55

Choose your locale and keyboard settings

sshot-57

Enter a name for the virtual machine and an administrative password

sshot-58

And enter the correct date, time, and timezone.  It usually gets the correct time and date from your computer itself, but the time zone is often incorrect.

sshot-59

XP will now finalize your changes, and then reboot.

sshot-61

When XP Mode restarts, choose your settings for updates.

 sshot-63 

Windows may ask to search for drivers.  Simply press cancel, as VMware Tools will contain everything we need.

sshot-62 

After a short delay, you should see your XP desktop in VMware Player!

sshot-65

There’s one last thing that needs to be installed – VMware Tools.  This should automatically open in XP Mode; if not, click Start, then My Computer, and finally double-click on the CD drive which should say VMware Tools.

sshot-2010-02-16-[20-02-36]

Now, simply run the Tools installer with the Typical setup type, and reboot the XP Mode when it’s finished.

sshot-67

Now VMWare is setup and we’re ready to start integrating it with Windows 7.

sshot-2010-02-16-[20-08-50]

Integrate XP Mode in VMware Player with Windows 7 

The real advantage of the default XP Mode in Windows 7 is that the XP programs are fully integrated with their Windows 7 counterparts.  You can run them seamlessly with other programs, copy between them, and even open and save files to the same folders.

Let’s set this up in VMware.  Copy and paste from Windows 7 to XP Mode in VMware is activated by default.  To use your XP programs seamlessly with Windows 7, click VM on the top of the VMware window, and click “Enter Unity.”

sshot-74

You can easily access any program or file in XP mode through a dedicated XP Mode Start Menu.  When you hover over your Windows 7 Start button, a new button called “Windows XP Mode” will above it.  Click there to access a full start menu from XP Mode right in Windows 7.

sshot-78

Here is an IE 6 window from XP running side-by-side with IE 8 in Windows 7, thanks to VMware Player!

sshot-77

By default, the virtualized windows will have a border and the VMware logo on their edge.

sshot-2010-02-16-[20-21-39]

To remove this logo, click VM in the VMware player window, then settings.  Click on the Options tab, and choose Unity on the left.  Now uncheck the boxes that say “Show borders” and “Show badges.”

sshot-76

Without having the VMWare borders and badges give everything a more authentic XP Mode look and feel.

sshot-2010-02-16-[20-23-15]

You can even use removable devices, such as flash drives, in XP Mode in VMware Player.  Whenever you connect a new device to your computer, VMware will remind you that you can add it to XP Mode.

sshot-82

Simply click VM, then Removable Devices.  Select your device name, and click Connect.

sshot-86

Save Files in XP Mode to My Documents in Windows 7

By default, files created in XP Mode in VMware Player will be saved inside the virtual machine.  It’s more convenient if they’re saved directly to the My Documents folder in Windows 7, so let’s change this.  Click VM, then Settings.  Click the Options tab, and then choose Shared Folders on the left.  Now click the bullet for “Always enabled” and check the box for “Map as a network drive in Windows guests.”

sshot-85

Now click Add at the bottom of that window.  This will let us add a shared folder.

sshot-87

Let’s add the My Documents folder from Windows 7.  Click Browse, and then select your My Documents folder.  Click Ok, and then click Next.

sshot-90

Make sure the box is checked that says “Enable this share” and then click Finish.  You can now close the settings window as well.

sshot-91

Back in XP Mode, click Start, then right click on My Documents, and select Properties.

sshot-4

Click Move to find the new My Documents folder.

  sshot-14

Find the folder we just shared from Windows 7 by clicking My Computer, then the drive that says “Shared Folders on ‘vmware-host’” or something similar.  Now select the folder we shared, Documents, and click Ok.

sshot-15

Click Ok in the main properties window.  It may offer to copy the files from your old My Documents folder to the new one; choose Yes to make sure you have all of your documents in Windows 7.

sshot-11

Now, whenever you go to save a file in XP Mode, it will automatically save in your My Documents folder on Windows 7.  You can repeat the same process for any folder you wish, such as your My Pictures and My Music folders.

Conclusion

That’s all … now you have your full XP Mode running on your computer without hardware virtualization.  Almost all the same features are there; the only thing you’re missing is the Start Menu integration, but VMware’s menu is the next best thing. In our tests using VMware worked as good or better as actual XP Mode on a machine that supports hardware virtualization. If you’re frustrated that the Windows 7 machine(s) you have don’t support XP Mode, using our VMware method works, and allows you to use it on whatever machine you want.

You might also want to check out our look at XP Mode in Windows 7 if your machine is capable of running it. To find out if your machine can run XP Mode the best tool we have used is Securable which is linked below.

Links

Download Windows XP Mode

Download VMware Player 3

Download Securable to Test if your Machine Can Run XP Mode.

Got an opinion to share? Click here to join the discussion

Similar Articles Productive Geek Tips
Latest Software Reviews Tinyhacker Random Tips

Picasa Album Downloader Snags Entire Albums in a Few Clicks [Downloads]

Windows/Mac/Linux: If you're looking for a quick way to download a photo album from Picasa without installing the desktop application, Picasa Album Downloader does just that—and you don't even need to register at the Picasa website.

Picasa is a terrific online photo storage service, but if you aren’t a regular user, you may not want to register for an account just to download some pictures from your nephew’s birthday party. Picasa Album Downloader lets you grab all the public photos you want without signing up for an account.

The free utility works on Windows, Mac, and Linux, and really couldn’t be easier to use. Once installed, just fire it up, tell the downloader what user name and album your after, and it does the rest for you. The tool collects all the images in the album, then files them neatly in a folder on your hard drive.

Picasa Album Downloader was just released a couple weeks ago and still bears the beta label, but it worked just fine for us. What apps help you manage photos you download from online storage services? Talk about them in the comments.


All the Smartphone OSes: A Beginners’ Guide [Smartphones]

Windows Phone Series 7 is here, and it's like nothing we've seen from Microsoft—or anyone else—before. But how does it measure up? And where does every other smartphone OS stand?

If you want to skip the gallery format, click here.

iPhone OS 3.x

The third major release of the iPhone’s software, and the second since the platform got its App Store, iPhone OS 3.x has succeeded on the strength of simplicity, intuitiveness and a tremendous selection of applications. It serves as the basis for the OS that will ship with the new Apple iPad.

Available: June 2009
Open Source/Free: No
Multiple Handset Manufacturers: No
Multitasking: No
Multitouch Interface: Yes
Browser/Engine: Safari/WebKit
Video Recording: Yes
Upgrades: Sync/Patcher
Syncing Software: Yes
App Store Size: 100k+
App Sideloading: No
Jailbreaking/rooting: Yes
Flash Support: No

Android 2.x

In just over a year, Google’s Linux-based Android OS has gone from a rough-edged software experiment to a smartphone powerhouse, running atop some of the most powerful hardware available. Version 2.1 is the software platform for Google’s own first phone, the Nexus One. Android phones vary in both hardware configurations and software versions, but are generally increasing in popularity.

Available: October ’09
Open Source/Free: Yes/Yes
Multiple Handset Manufacturers: Yes
Multitasking: Yes
Multitouch Interface: Yes
Browser/Engine: Chrome/WebKit
Video Recording: Yes
Upgrades: Over the Air
Syncing Software: No
App Store Size: 20k+
App Sideloading: Yes
Jailbreaking/rooting: Yes
Flash Support: Within six months

Palm webOS 1.x

Palm’s webOS represented a complete reboot for the company, whose aging Palm OS found itself outpaced by more modern, finger-friendly offerings from Apple and Google. At the core of the OS is a novel multitasking system, with which users can cycles through apps, or “cards.” Another webOS selling point is the deep integration of social networking directly into the OS, and an emphasis on messaging.

Available: June ’09
Open Source/Free: No/No
Multiple Handset Manufacturers: No
Multitasking: Yes
Multitouch Interface: Yes
Browser/Engine: webOS/WebKit
Video Recording: Coming soon
Upgrades: Over the Air
Syncing Software: No
App Store Size: 1400+
App Sideloading: No
Jailbreaking/rooting: Yes
Flash Support: Within six months

BlackBerry OS 5

RIM is known for issuing frequent updates for its mobile OSes, but they are minimal, and at heart, BlackBerry OS 5 is deeply similar to its early, decade-old predecessors. BlackBerry OS is inclined towards messaging—its inboxes feature prominently—with web browsing and apps as secondary focuses. RIM's recent success with the consumer (as opposed to enterprise) market shows they've taken pains to improve the usability and aesthetics of the OS, though its corporate roots still show through.

Available: November ’09
Open Source/Free: No/No
Multiple Handset Manufacturers: No
Multitasking: Yes
Multitouch Interface: No
Browser/Engine: BlackBerry/Proprietary (WebKit forthcoming)
Video Recording: Yes
Upgrades: Sync/patcher/over the air
Syncing Software: Yes
App Store Size: 3k+
App Sideloading: Yes
Jailbreaking/rooting: No
Flash Support: Within six months

Windows Mobile 6.5.x

Windows Mobile 6.5 is the last predecessor to Windows Phone 7 Series, and it will coexist with WP7 for the foreseeable future, as a bridge for corporate customers. Its basic design and codebase harks back to the early 2000s, and while it featured multitasking, copy and paste and a significant number of 3rd party apps well before the iPhone or Android did, WinMo failed to keep up with its competitors. Even with version 6.5, which added new, finger-friendly interface elements and an app marketplace, success was not to be. Despite its successor’s seemingly related name, this is the end of the road for the WinMo OS.

Available: October ’09
Open Source/Free: No/Licensed
Multiple Handset Manufacturers: Yes
Multitasking: Yes
Multitouch Interface: No
Browser/Engine: Internet Explorer/Trident
Video Recording: Yes
Upgrades: Sync/Patcher
Syncing Software: Yes
App Store Size: Under 500 1000+, depending on handset
App Sideloading: Yes
Jailbreaking/rooting: No
Flash Support: Yes

Windows Phone 7 Series

Windows Phone 7 Series is a total revamping of Microsoft’s mobile strategy, drawing more on design philosophy of the Zune HD than of Windows Mobile. The interface is designed primarily for touch input, and eschews icon grids and menus for a series of paneled hubs. The unreleased OS features deep integration with Xbox and Zune services, as well as a completely new app store.

Available: Holiday ’10
Open Source/Free: No/No
Multiple Handset Manufacturers: Yes
Multitasking: No, probably! (With possible exceptions.)
Multitouch Interface: Yes
Browser/Engine: Internet Explorer/Trident
Video Recording: Yes
Upgrades: TBD
Syncing Software: Media
App Store Size: TBD
App Sideloading: TBD (Unlikely)
Jailbreaking/rooting: TBD
Flash Support: TBD (Probable)


Sexting attracts teens to Blackberry Messenger

Sexting is bad according to LG Electronics, but it may be good for RIM, which has seen a record number of teens and young people signing up for a blackberry over the past year, attracted mainly by the magnetic pull of its Blackberry Messenger service.

<!–break–>

"A lot of kids say they would rather a Blackberry than an iPhone because of BBM," a Blackberry spokeswoman told TG Daily at a Mobile World Congress (MWC) press event on Monday night. 

Sexting attracts teens to Blackberry Messenger"They like to be able to message their friends, and even flirt with random strangers" she added, alluding to a phenomenon by which people search for others’ Blackberry PINs online.

Just what parents want their 16 year old sons and daughters to be doing.

This also blazes a new trail for RIM, which has – until very lately – been almost exclusively focused on the enterprise and business user. But teens seem to flocking to Blackberry in droves, with the number one reason being the free messaging service which makes SMSing friends somewhat obsolete.

"Over the past few months I’ve started to see a lot of young girls and guys, teenagers and university students choosing Blackberry because they realize its social and rich media capabilities," the Blackberry spokeswoman told us. 

"Young people want a phone that lets them use Facebook, Twitter, MSN, video, has a decent camera, and we have all that. Plus, the attraction of Blackberry is proving to be a very strong incentive."

Guess Sexting sells.

Google Says Buzz Needed Wider Testing, Issuing Fixes This Week [Updates]

In one week, Google’s Buzz social network has moved through a splashy launch, a quick fix, a major clean-up, and now, an apology. Buzz’s product manager says his team is “very, very sorry,” and that (more) fixes are coming this week.

Todd Jackson, Buzz product manager, tells BBC News that Buzz was tested internally by 20,000 Google employees and affiliates, but that wider public testing should have been solicited before launching. The BBC post offers a decent summation of the problems users and privacy advocates have pointed out, like the public sharing of followers and followees (which has since been tweaked).

Yada, yada, so what’s going to happen now? Jackson says “transparency and control” improvements would be going live “this week.”

Other possible changes include a better “preferences menu” that will allow users to better tailor what appears in their inbox, and a more prominent “mute” option to switch the service off.

Another idea, said Mr Jackson, was to create a separate service that was not part of Gmail.

“We think that integration with Gmail was absolutely the right way to go – we wanted to make Buzz easily accessible to people,” he said. “We also want to give people who don’t use Gmail the ability to use Buzz, so we’re exploring the idea of offering a separate destination site.”

The most recently announced changes would go live “this week”, he added.

Better still, Jackson says the changes and features are being bug tested and translated into 53 languages, so a full-fledged overhaul should come for everyone very soon.

It’s reassuring to see Google acknowledge its flaws and move quickly to address its users’ issues. Then again, their trial-and-error is being staged with users’ address books. What else would you want to see Buzz fix, as long as they’ve got the scalpel and sutures out?


Windows Phone 7 Interface: Microsoft Has Out-Appled Apple [UI Design]

I’m sorry, Cupertino, but Microsoft has nailed it. Windows Phone 7 feels like an iPhone from the future. The UI has the simplicity and elegance of Apple’s industrial design, while the iPhone’s UI still feels like a colorized Palm Pilot.

That doesn’t mean that the Windows Phone 7’s user experience would be better than Apple’s. The two user interface concepts—data-centric vs function-centric—are very different, and the former is quite a radical departure from what people are used to.

And if you’re not familiar with Windows Phone 7, check out our hands on and the post where we explain everything about it.

With the iPhone, Apple put together an extremely simple modal interface that works, one that people of all ages and backgrounds understand right away: “This is a device that adopts different functions and gives me access to different kinds of information depending on the icon I click on.”

It’s pretty simple idea, which made it a raging success. In fact, that success is the reason why this model is Apple’s bet not only for mobile phones, but for the future of computing. It is also the reason why the Androids, Palms, and Blackberries of this world are following them.

Clean slate

Microsoft’s approach is completely different. Instead of becoming another me-too cellphone, like Android and the rest, the Windows Phone 7 team came up their own vision of what the cellphone should be. In the process, they have created a beautiful user interface in which the data is at the center of user interaction. Not the apps—specific functions—but the information itself. At some points, in fact, it feels like the information is the interface itself.

Out of the box, this information is organized into areas called hubs, which follow the user's areas of interest. Accessible through live tiles in the home screen, the Me (the user), people, pictures and video, music, and games—plus the omnipresent search—hubs give views into several data sources, connecting and presenting them into an interweaved panoramic stream. These hubs dig heavily into many databases, both locally and into the cloud.

Rather than accessing an app to get contact information and make a call to a person, open another app to get her Twitter updates, and then another app to get her Facebook updates, and another for her latest mails to you, and yet another one to watch her photos, the Windows Phone’s people hub offers a seamless view into all of it, presented in a very simple and logical way. On a function-centric model like the iPhone, when the user thinks “I want to make a call”, he puts the device in “calling mode” by clicking on an app, selects a contact, and calls. When the user thinks “What’s up with John Smith?” he puts the device in Facebook or Twitter or Mail mode, and so on.

Microsoft has organized the hubs into panoramas, by stitching groups of information as columns of a single landscape screen—bigger than the phone's display—that can be scrolled with your finger. The solution—tied together with minimalist interface aesthetics and animations that are inviting, elegant, and never superfluous—works great.

What about other applications?

Instinctively, I like Microsoft's approach to organizing the core of our digital lives—people+social+multimedia+communication all merged into the hubs. I like it better than the "it's a phone, it's a mail program, it's a browser, it's an iPod" Apple approach. It's less rigid than the iPhone or Android's model, offering a richer experience, inviting to explore, and offering data from many points of view in a quick, clearly organized way. It also seems more human, and that's certainly something Apple—or their followers—have to worry about.

Does that mean that function-centric models are worse? Like I said before, not necessarily. Especially because the information-centric panoramas don’t fit every single task people expect their iPhones to perform now. And when I say every single task, I really mean the two gazillion apps populating the Apple store. Microsoft could dress the hub experience in any way they want, but if their devices don’t offer a rich application market, they will fail the same way the current competition is failing against Apple.

Fortunately for Microsoft, the Windows Phone model is not only information-centric, but also function-centric. According to Joe Belfiore, gran jefe of the Microsoft’s Windows Phone Program, applications are not required to plug into the hub metaphor or the panorama user interface. When the development toolkit comes out in a month, it will encourage applications just like the ones you have in the iPhone today. In other words, Microsoft understands that one approach is as important as the other.

They are just hoping that their hubs would be a better, funner, more intuitive way to access and cultivate our digital lives, which is mainly what most consumers want to do nowadays. Looking at what they have shown today, I think they may be in the right track. But, like the Zune HD, it just may be too late.